p:: React
- Next.js by Vercel - The React Framework
- The React Framework for the Web
Install
npx create-next-app@latest✔ What is your project named? … my-app
✔ Would you like to use TypeScript? … No / Yes
✔ Would you like to use ESLint? … No / Yes
✔ Would you like to use Tailwind CSS? … No / Yes
✔ Would you like to use `src/` directory? … No / Yes
✔ Would you like to use App Router? (recommended) … No / Yes
✔ Would you like to customize the default import alias (@/*)? … No / Yes
✔ What import alias would you like configured? … @/*
Creating a new Next.js app in /Users/adithya321/Documents/adithya321/my-app.
Using npm.
Initializing project with template: app-tw
Installing dependencies:
- react
- react-dom
- next
Installing devDependencies:
- typescript
- @types/node
- @types/react
- @types/react-dom
- postcss
- tailwindcss
- eslint
- eslint-config-next
added 360 packages, and audited 361 packages in 33s
133 packages are looking for funding
run `npm fund` for details
found 0 vulnerabilities
Initialized a git repository.
Success! Created my-app at /Users/adithya321/Documents/adithya321/my-appcd my-app
npm run devNext.js - shadcn/ui
npx shadcn-ui@latest init✔ Which style would you like to use? › Default
✔ Which color would you like to use as base color? › Slate
✔ Would you like to use CSS variables for colors? … no / yes
✔ Writing components.json...
✔ Initializing project...
✔ Installing dependencies...
Success! Project initialization completed. You may now add components.pnpm dlx shadcn-ui@latest add buttonPackages: +198
++++++++++++++++++++++++++++++++++++++++++++++++++++++++++++++++++++++++++++++++++++++++++++++++++++++++++++++++++++++++++++++++++++++++++++++++
Progress: resolved 198, reused 198, downloaded 0, added 198, done
✔ Done.Dark mode - Next.js - shadcn/ui
npm install next-themes
added 1 package, and audited 369 packages in 2s

135 packages are looking for funding
  run `npm fund` for details

found 0 vulnerabilities
What is Next.js? | Learn Next.js
Building Blocks of a Web Application
There are a few things you need to consider when building modern applications. Such as:
- User Interface - how users will consume and interact with your application.
- Routing - how users navigate between different parts of your application.
- Data Fetching - where your data lives and how to get it.
- Rendering - when and where you render static or dynamic content.
- Integrations - what third-party services you use (CMS, auth, payments, etc) and how you connect to them.
- Infrastructure - where you deploy, store, and run your application code (Serverless, CDN, Edge, etc).
- Performance - how to optimize your application for end-users.
- Scalability - how your application adapts as your team, data, and traffic grow.
- Developer Experience - your team’s experience building and maintaining your application.
For each part of your application, you will need to decide whether you will build a solution yourself or use other tools such as libraries and frameworks.
What is React?
React is a JavaScript library for building interactive user interfaces.
Part of React’s success is that it is relatively unopinionated about the other aspects of building applications. This has resulted in a flourishing ecosystem of third-party tools and solutions.
It also means, however, that building a complete React application from the ground up requires some effort. Developers need to spend time configuring tools and reinventing solutions for common application requirements.
What is Next.js?
Next.js is a React framework that gives you building blocks to create web applications.
![][https://nextjs.org/static/images/learn/foundations/next-app.png]
Next.js aims to have best-in-class developer experience and many built-in features, such as:
- An intuitive page-based routing system (with support for dynamic routes)
- Pre-rendering, both static generation (SSG) and server-side rendering (SSR) are supported on a per-page basis
- Automatic code splitting for faster page loads
- Client-side routing with optimized prefetching
- Built-in CSS and Sass support, and support for any CSS-in-JS library
- Development environment with Fast Refresh support
- API routes to build API endpoints with Serverless Functions
- Fully extendable
How Next.js Works | Learn Next.js
In the next sections, we’ll look at what happens to your application code during these different stages:
- The environment where your code runs: Development vs. Production
- When your code runs: Build Time vs. Runtime
- Where rendering happens: Client vs. Server
Development and Production Environments
- In the development stage, Next.js optimizes for the developer and their experience building the application. It comes with features that aim to improve the Developer Experience, such as the built-in TypeScript and ESLint integrations, Fast Refresh, and more.
- In the production stage, Next.js optimizes for the end-users, and their experience using the application. It aims to transform the code to make it performant and accessible.
The Next.js Compiler
This is made possible because Next.js has a compiler written in Rust, a low-level programming language, and SWC, a platform that can be used for compilation, minification, bundling, and more.
What is Code Splitting?
Developers usually split their applications into multiple pages that can be accessed from different URLs. Each of these pages becomes a unique entry point into the application.
Code-splitting is the process of splitting the application’s bundle into smaller chunks required by each entry point. The goal is to improve the application’s initial load time by only loading the code required to run that page.
Next.js has built-in support for code splitting. Each file inside your pages/ directory will be automatically code split into its own JavaScript bundle during the build step.
Further:
- Any code shared between pages is also split into another bundle to avoid re-downloading the same code on further navigation.
- After the initial page load, Next.js can start pre-loading the code of other pages users are likely to navigate to.
- Dynamic imports are another way to manually split what code is initially loaded.
What is Rendering?
There is an unavoidable unit of work to convert the code you write in React into the HTML representation of your UI. This process is called rendering.
With Next.js, three types of rendering methods are available: Server-Side Rendering, Static Site Generation, and Client-Side Rendering.
Client-Side Rendering
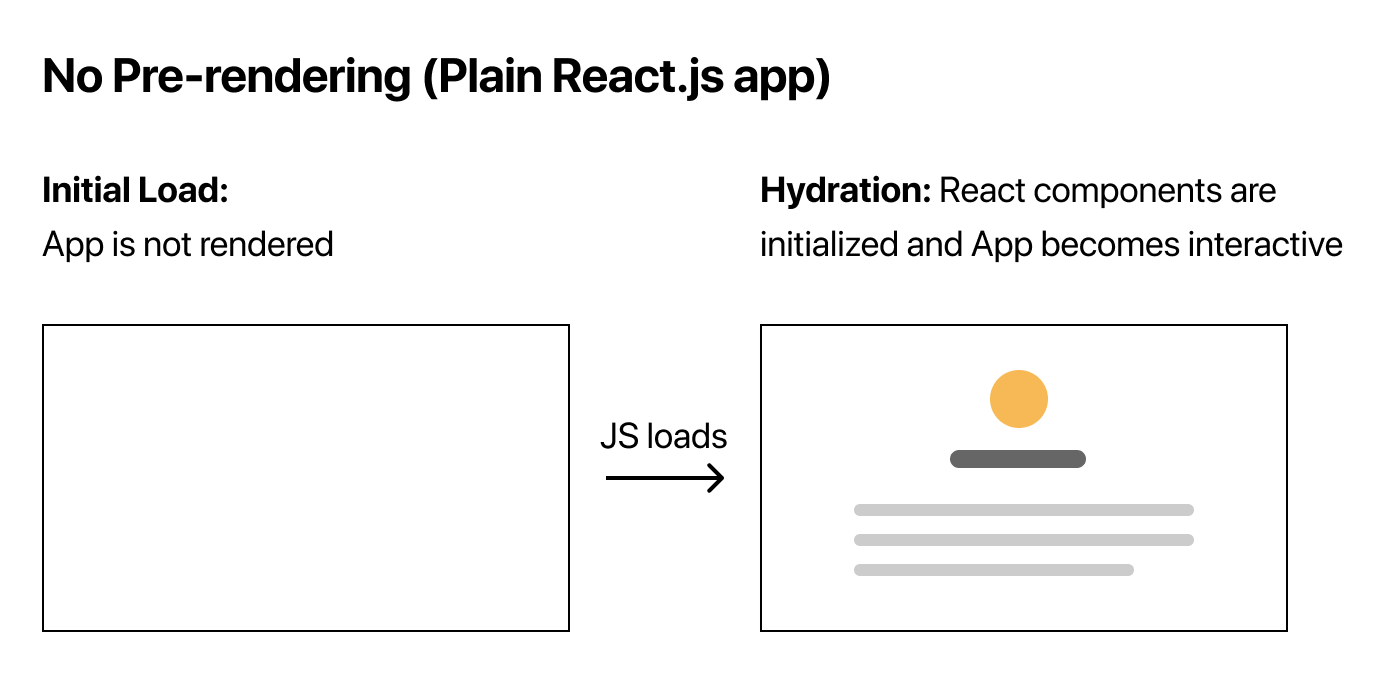
In a standard React application, the browser receives an empty HTML shell from the server along with the JavaScript instructions to construct the UI. This is called client-side rendering because the initial rendering work happens on the user’s device.

Note: You can opt to use client-side rendering for specific components in your Next.js application by choosing to fetch data with React’s
useEffect()or a data fetching hook such as useSWR.
In contrast, Next.js pre-renders every page by default.
Pre-Rendering
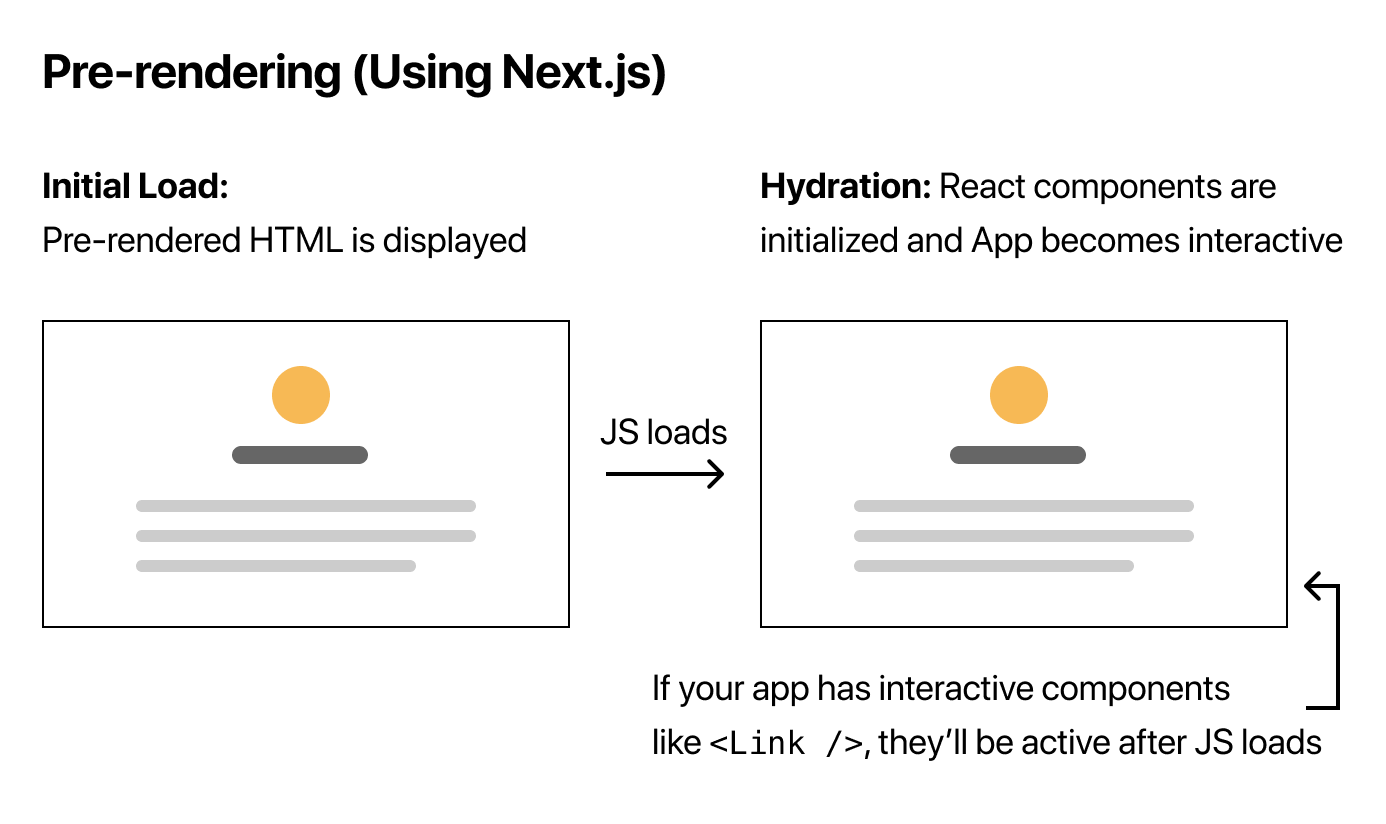
Pre-rendering means the HTML is generated in advance, on a server, instead of having it all done by JavaScript on the user’s device.
Server-Side Rendering and Static Site Generation are also referred to as Pre-Rendering because the fetching of external data and transformation of React components into HTML happens before the result is sent to the client.

In practice, this means that for a fully client-side rendered app, the user will see a blank page while the rendering work is being done. Compared to a pre-rendered app, where the user will see the constructed HTML.
Let’s discuss the two types of pre-rendering:
Server-Side Rendering
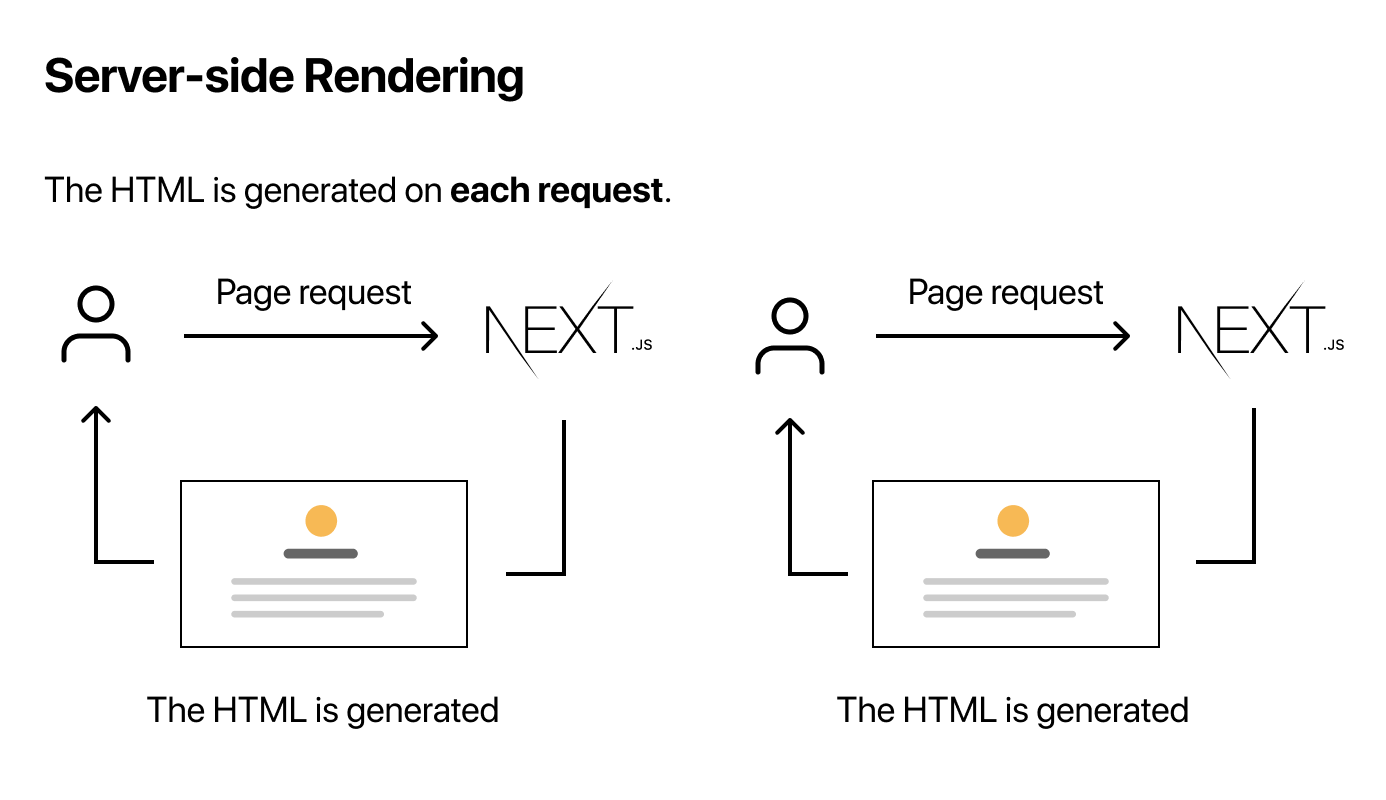
With server-side rendering, the HTML of the page is generated on a server for each request. The generated HTML, JSON data, and JavaScript instructions to make the page interactive are then sent to the client.
On the client, the HTML is used to show a fast non-interactive page, while React uses the JSON data and JavaScript instructions to make components interactive (for example, attaching event handlers to a button). This process is called hydration.
In Next.js, you can opt to server-side render pages by using getServerSideProps.
Note: React 18 and Next 12 introduce an alpha version of React server components. Server components are completely rendered on the server and do not require client-side JavaScript to render. In addition, server components allow developers to keep some logic on the server and only send the result of that logic to the client. This reduces the bundle size sent to the client and improves client-side rendering performance. Learn more about React server components here.
Static Site Generation
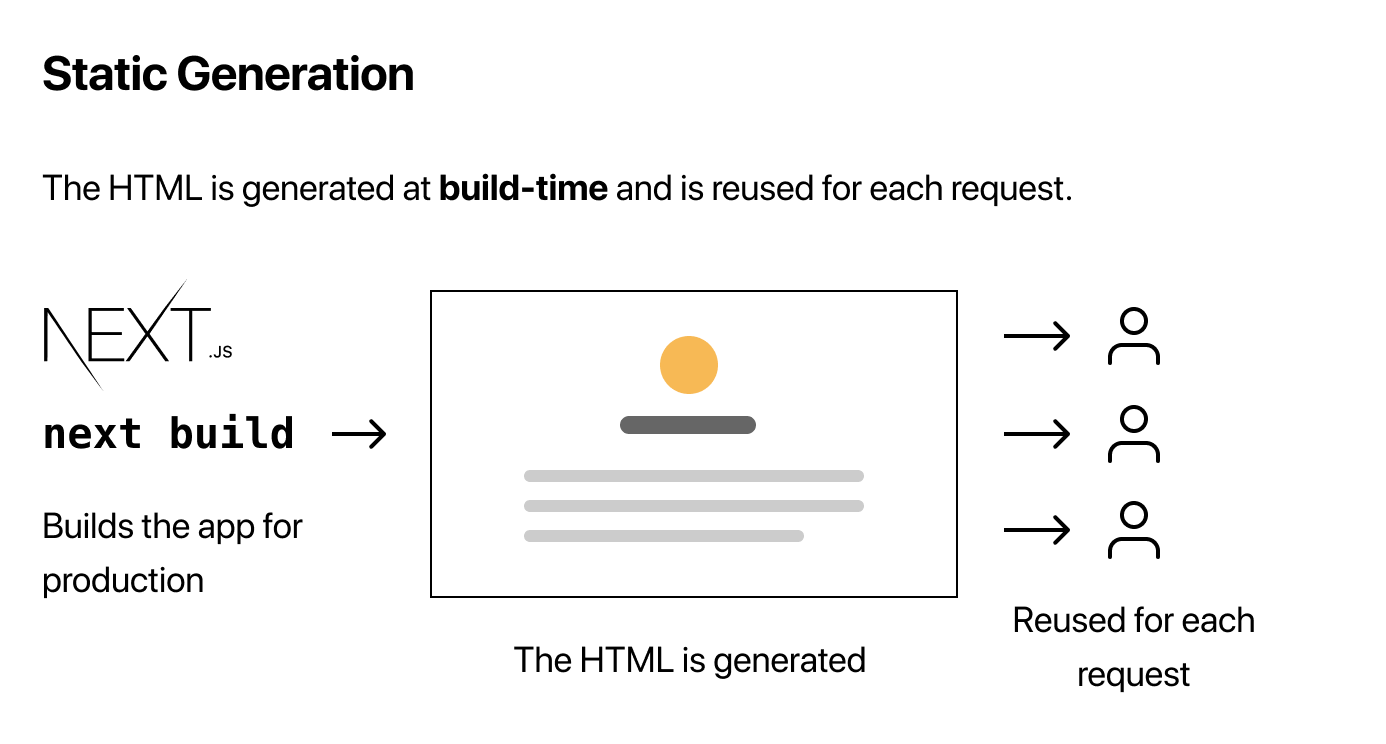
With Static Site Generation, the HTML is generated on the server, but unlike server-side rendering, there is no server at runtime. Instead, content is generated once, at build time, when the application is deployed, and the HTML is stored in a CDN and re-used for each request.
In Next.js, you can opt to statically generate pages by using getStaticProps.
Note: You can use Incremental Static Regeneration to create or update static pages after you’ve built your site. This means you do not have to rebuild your entire site if your data changes.
The beauty of Next.js is that you can choose the most appropriate rendering method for your use case on a page-by-page basis, whether that’s Static Site Generation, Server-side Rendering, or Client-Side Rendering. To learn more about which rendering method is right for your specific use case, see the data fetching docs.
Create a Next.js App | Learn Next.js
npx create-next-app@latest nextjs-blog --use-npm --example "https://github.com/vercel/next-learn/tree/main/basics/learn-starter"Need to install the following packages:
[email protected]
Ok to proceed? (y) y
Creating a new Next.js app in /Users/adithya321/Documents/adithya321/nextjs-blog.
Downloading files from repo https://github.com/vercel/next-learn/tree/main/basics/learn-starter. This might take a moment.
Installing packages. This might take a couple of minutes.
added 23 packages, and audited 24 packages in 9s
4 packages are looking for funding
run `npm fund` for details
found 0 vulnerabilities
Initialized a git repository.
Success! Created nextjs-blog at /Users/adithya321/Documents/adithya321/nextjs-blog
Inside that directory, you can run several commands:
npm run dev
Starts the development server.
npm run build
Builds the app for production.
npm start
Runs the built app in production mode.
We suggest that you begin by typing:
cd nextjs-blog
npm run devcd nextjs-blog
npm run dev
> dev
> next dev

- ready started server on [::]:3000, url: http://localhost:3000
- event compiled client and server successfully in 73 ms (18 modules)
Navigate Between Pages | Learn Next.js
Pages in Next.js
In Next.js, a page is a React Component exported from a file in the pages directory.
Pages are associated with a route based on their file name. For example, in development:
pages/index.jsis associated with the/route.pages/posts/first-post.jsis associated with the/posts/first-postroute.
Link Component
When linking between pages on websites, you use the <a> HTML tag.
In Next.js, you can use the Link Component next/link to link between pages in your application. <Link> allows you to do client-side navigation and accepts props that give you better control over the navigation behavior.
Client-Side Navigation
Client-side navigation means that the page transition happens using JavaScript, which is faster than the default navigation done by the browser.
Code splitting and prefetching
Next.js does code splitting automatically, so each page only loads what’s necessary for that page. That means when the homepage is rendered, the code for other pages is not served initially.
This ensures that the homepage loads quickly even if you have hundreds of pages.
Only loading the code for the page you request also means that pages become isolated. If a certain page throws an error, the rest of the application would still work.
Furthermore, in a production build of Next.js, whenever Link components appear in the browser’s viewport, Next.js automatically prefetches the code for the linked page in the background. By the time you click the link, the code for the destination page will already be loaded in the background, and the page transition will be near-instant!
Note: If you need to link to an external page outside the Next.js app, just use an
<a>tag withoutLink.
Assets, Metadata, and CSS | Learn Next.js
Assets
Next.js can serve static assets, like images, under the top-level public directory. Files inside public can be referenced from the root of the application similar to pages.
The public directory is also useful for robots.txt, Google Site Verification, and any other static assets. Check out the documentation for Static File Serving to learn more.
Unoptimized Image
With regular HTML, you would add your profile picture as follows:
<img src="/images/profile.jpg" alt="Your Name" />However, this means you have to manually handle:
- Ensuring your image is responsive on different screen sizes
- Optimizing your images with a third-party tool or library
- Only loading images when they enter the viewport
And more. Instead, Next.js provides an Image component out of the box to handle this for you.
Image Component and Image Optimization
next/image is an extension of the HTML <img> element, evolved for the modern web.
Next.js also has support for Image Optimization by default. This allows for resizing, optimizing, and serving images in modern formats like WebP when the browser supports it. This avoids shipping large images to devices with a smaller viewport. It also allows Next.js to automatically adopt future image formats and serve them to browsers that support those formats.
Automatic Image Optimization works with any image source. Even if the image is hosted by an external data source, like a CMS, it can still be optimized.
Using the Image Component
Instead of optimizing images at build time, Next.js optimizes images on-demand, as users request them. Unlike static site generators and static-only solutions, your build times aren’t increased, whether shipping 10 images or 10 million images.
Images are lazy loaded by default. That means your page speed isn’t penalized for images outside the viewport. Images load as they are scrolled into viewport.
Images are always rendered in such a way as to avoid Cumulative Layout Shift, a Core Web Vital that Google is going to use in search ranking.
Here’s an example using next/image to display our profile picture. The height and width props should be the desired rendering size, with an aspect ratio identical to the source image.
import Image from 'next/image';

const YourComponent = () => (
  <Image
    src="/images/profile.jpg" // Route of the image file
    height={144} // Desired size with correct aspect ratio
    width={144} // Desired size with correct aspect ratio
    alt="Your Name"
  />
);
Metadata
import Head from 'next/head';

...

<Head>
  <title>Create Next App</title>
  <link rel="icon" href="/favicon.ico" />
</Head>

...
Notice that <Head> is used instead of the lowercase <head>. <Head> is a React Component that is built into Next.js. It allows you to modify the <head> of a page.
To learn more about the Head component, check out the API reference for next/head.
If you want to customize the <html> tag, for example to add the lang attribute, you can do so by creating a pages/_document.js file. Learn more in the custom Document documentation.
Third-Party JavaScript
Third-party JavaScript refers to any scripts that are added from a third-party source. Usually, third-party scripts are included in order to introduce newer functionality into a site that does not need to be written from scratch, such as analytics, ads, and customer support widgets.
<Head>
  <title>First Post</title>
  <script src="https://connect.facebook.net/en_US/sdk.js" />
</Head>
Although this approach works, including scripts in this manner does not give a clear idea of when it would load with respect to the other JavaScript code fetched on the same page. If a particular script is render-blocking and can delay page content from loading, this can significantly impact performance.
Using the Script Component
next/script is an extension of the HTML <script> element and optimizes when additional scripts are fetched and executed.
import Script from 'next/script';

...

      <Head>
        <title>First Post</title>
      </Head>
      <Script
        src="https://connect.facebook.net/en_US/sdk.js"
        strategy="lazyOnload"
        onLoad={() =>
          console.log(`script loaded correctly, window.FB has been populated`)
        }
      />

...strategycontrols when the third-party script should load. A value oflazyOnloadtells Next.js to load this particular script lazily during browser idle timeonLoadis used to run any JavaScript code immediately after the script has finished loading.
CSS Styling
CSS Modules
CSS modules allow you to locally scope CSS at the component-level by automatically creating unique class names. This allows you to use the same CSS class name in different files without worrying about class name collisions.
In addition to CSS modules, you can style your Next.js application in a variety of ways, including:
- Sass which allows you to import
.cssand.scssfiles. - PostCSS libraries like Tailwind CSS.
- CSS-in-JS libraries such as styled-jsx, styled-components, and emotion
Global Styles
CSS Modules are useful for component-level styles. But if you want some CSS to be loaded by every page, Next.js has support for that as well.
To load global CSS to your application, create a file called pages/_app.js with the following content:
import '../styles/global.css';

export default function App({ Component, pageProps }) {
  return <Component {...pageProps} />;
}
In Next.js, you can add global CSS files by importing them from pages/_app.js. You cannot import global CSS anywhere else.
The default export of _app.js is a top-level React component that wraps all the pages in your application. You can use this component to keep state when navigating between pages, or to add global styles as we’re doing here. Learn more about _app.js file.
Important: You need to restart the development server when you add pages/_app.js. Press Ctrl + c to stop the server and run:
npm run devPre-rendering and Data Fetching | Learn Next.js
By default, Next.js pre-renders every page. This means that Next.js generates HTML for each page in advance, instead of having it all done by client-side JavaScript. Pre-rendering can result in better performance and SEO
Each generated HTML is associated with minimal JavaScript code necessary for that page. When a page is loaded by the browser, its JavaScript code runs and makes the page fully interactive. (This process is called hydration.)
Two Forms of Pre-rendering
Next.js has two forms of pre-rendering: Static Generation and Server-side Rendering. The difference is in when it generates the HTML for a page.
- Static Generation is the pre-rendering method that generates the HTML at build time. The pre-rendered HTML is then reused on each request.
- Server-side Rendering is the pre-rendering method that generates the HTML on each request.
Per-page Basis
Importantly, Next.js lets you choose which pre-rendering form to use for each page. You can create a “hybrid” Next.js app by using Static Generation for most pages and using Server-side Rendering for others.
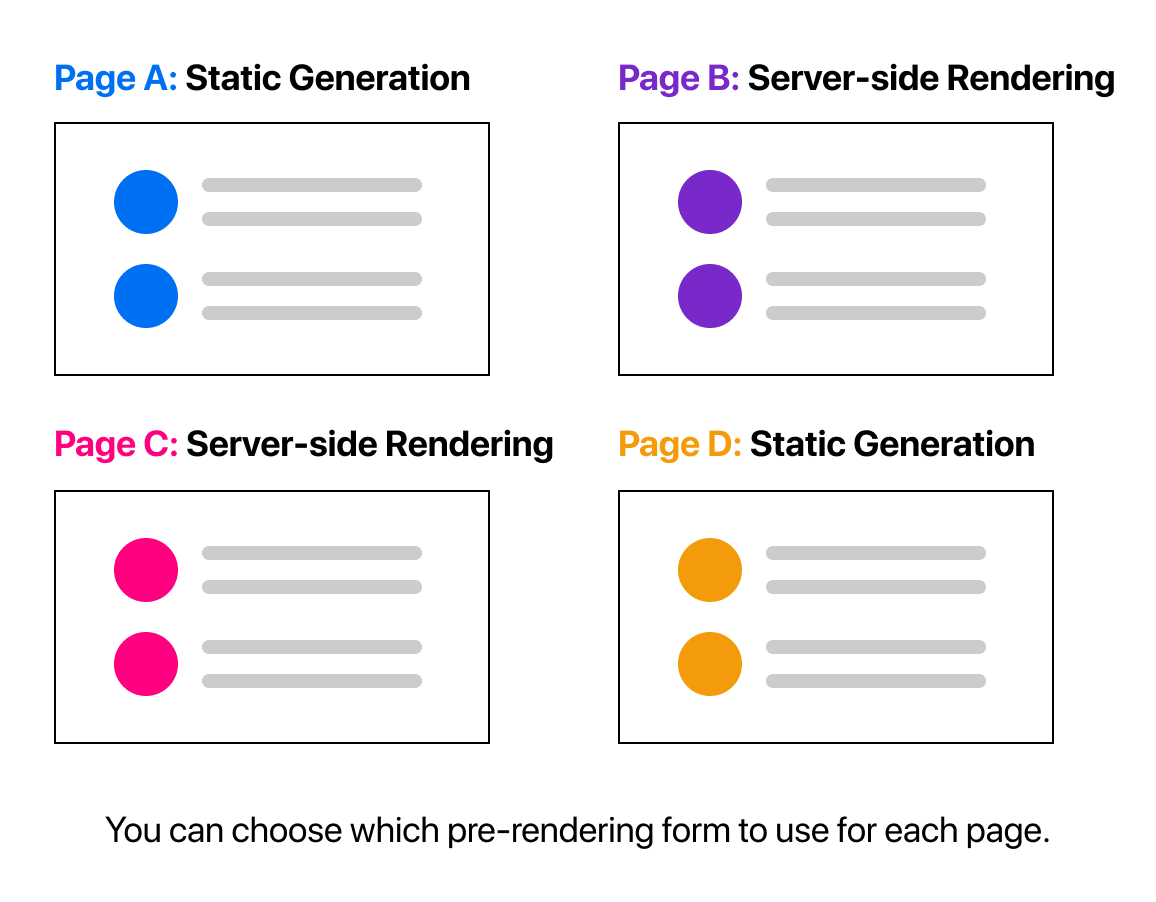
When to Use Static Generation v.s. Server-side Rendering
We recommend using Static Generation (with and without data) whenever possible because your page can be built once and served by CDN, which makes it much faster than having a server render the page on every request.
You can use Static Generation for many types of pages, including:
- Marketing pages
- Blog posts
- E-commerce product listings
- Help and documentation
You should ask yourself: “Can I pre-render this page ahead of a user’s request?” If the answer is yes, then you should choose Static Generation.
On the other hand, Static Generation is not a good idea if you cannot pre-render a page ahead of a user’s request. Maybe your page shows frequently updated data, and the page content changes on every request.
In that case, you can use Server-side Rendering. It will be slower, but the pre-rendered page will always be up-to-date. Or you can skip pre-rendering and use client-side JavaScript to populate frequently updated data.
Static Generation with and without Data
Static Generation can be done with and without data.
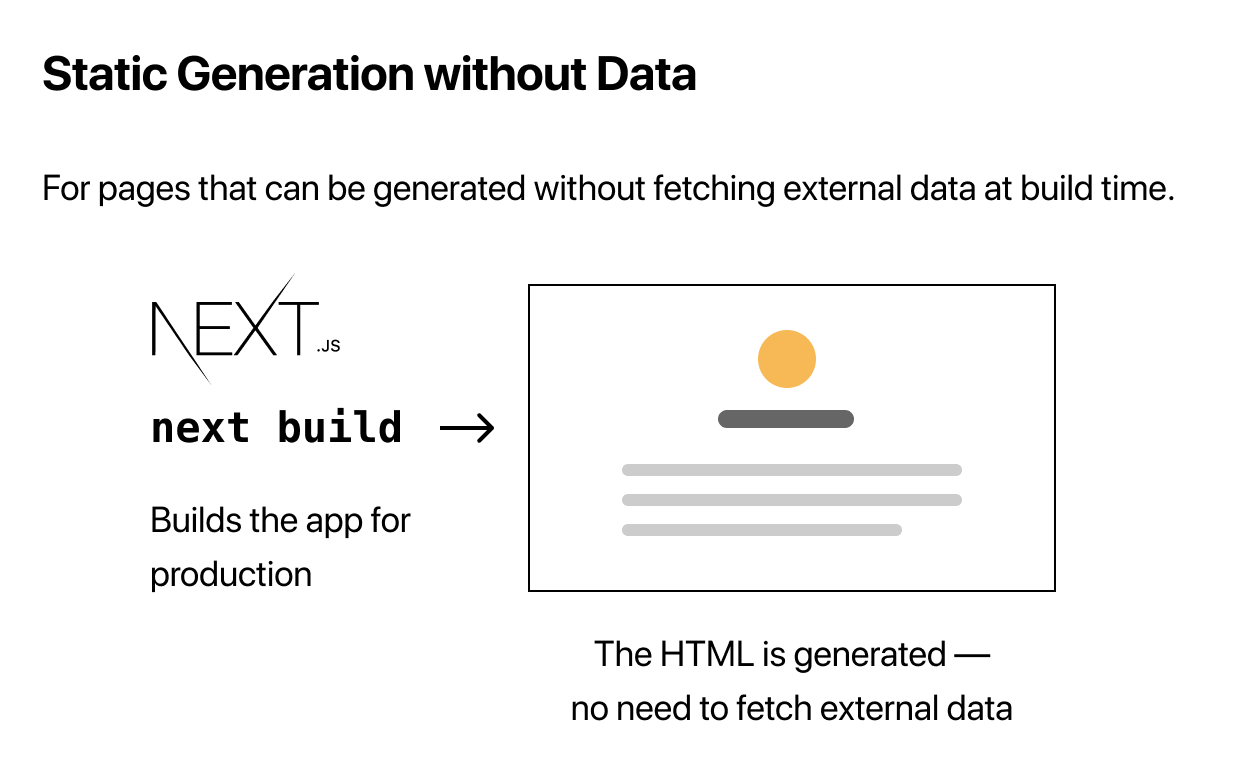
However, for some pages, you might not be able to render the HTML without first fetching some external data. Maybe you need to access the file system, fetch external API, or query your database at build time. Next.js supports this case — Static Generation with data — out of the box.
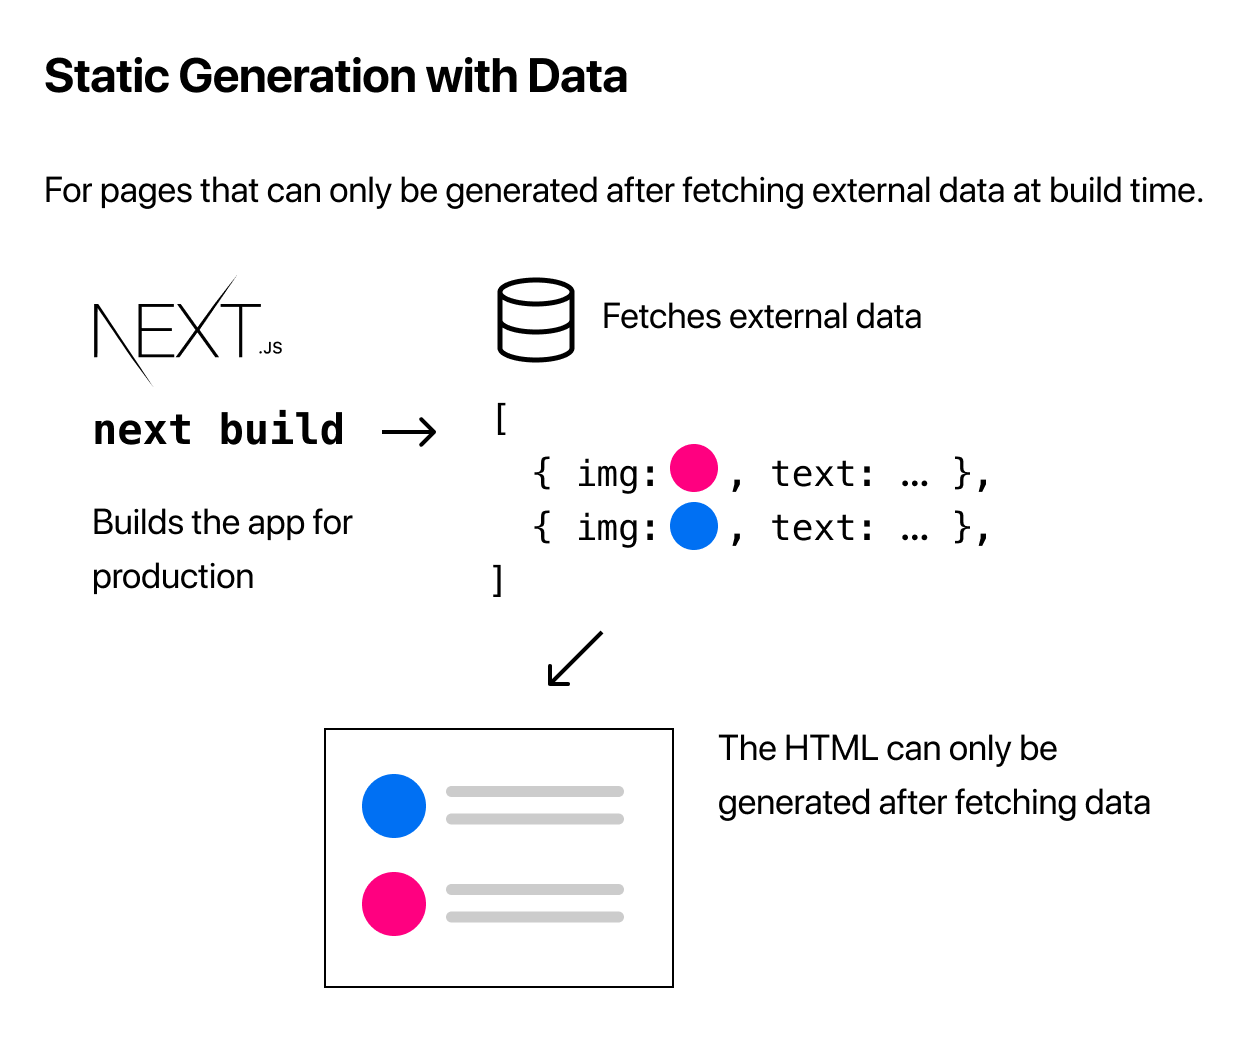
Static Generation with Data using getStaticProps
How does it work? Well, in Next.js, when you export a page component, you can also export an async function called getStaticProps. If you do this, then:
getStaticPropsruns at build time in production, and…- Inside the function, you can fetch external data and send it as props to the page.
export default function Home(props) { ... }

export async function getStaticProps() {
  // Get external data from the file system, API, DB, etc.
  const data = ...

  // The value of the `props` key will be
  //  passed to the `Home` component
  return {
    props: ...
  }
}Note: In development mode,
getStaticPropsruns on each request instead.
getStaticProps Details
getStaticProps only runs on the server-side. It will never run on the client-side. It won’t even be included in the JS bundle for the browser. That means you can write code such as direct database queries without them being sent to browsers.
Development vs. Production
- In development (
npm run devoryarn dev),getStaticPropsruns on every request. - In production,
getStaticPropsruns at build time. However, this behavior can be enhanced using thefallbackkey returned bygetStaticPaths
Because it’s meant to be run at build time, you won’t be able to use data that’s only available during request time, such as query parameters or HTTP headers.
Fetching Data at Request Time
If you need to fetch data at request time instead of at build time, you can try Server-side Rendering:
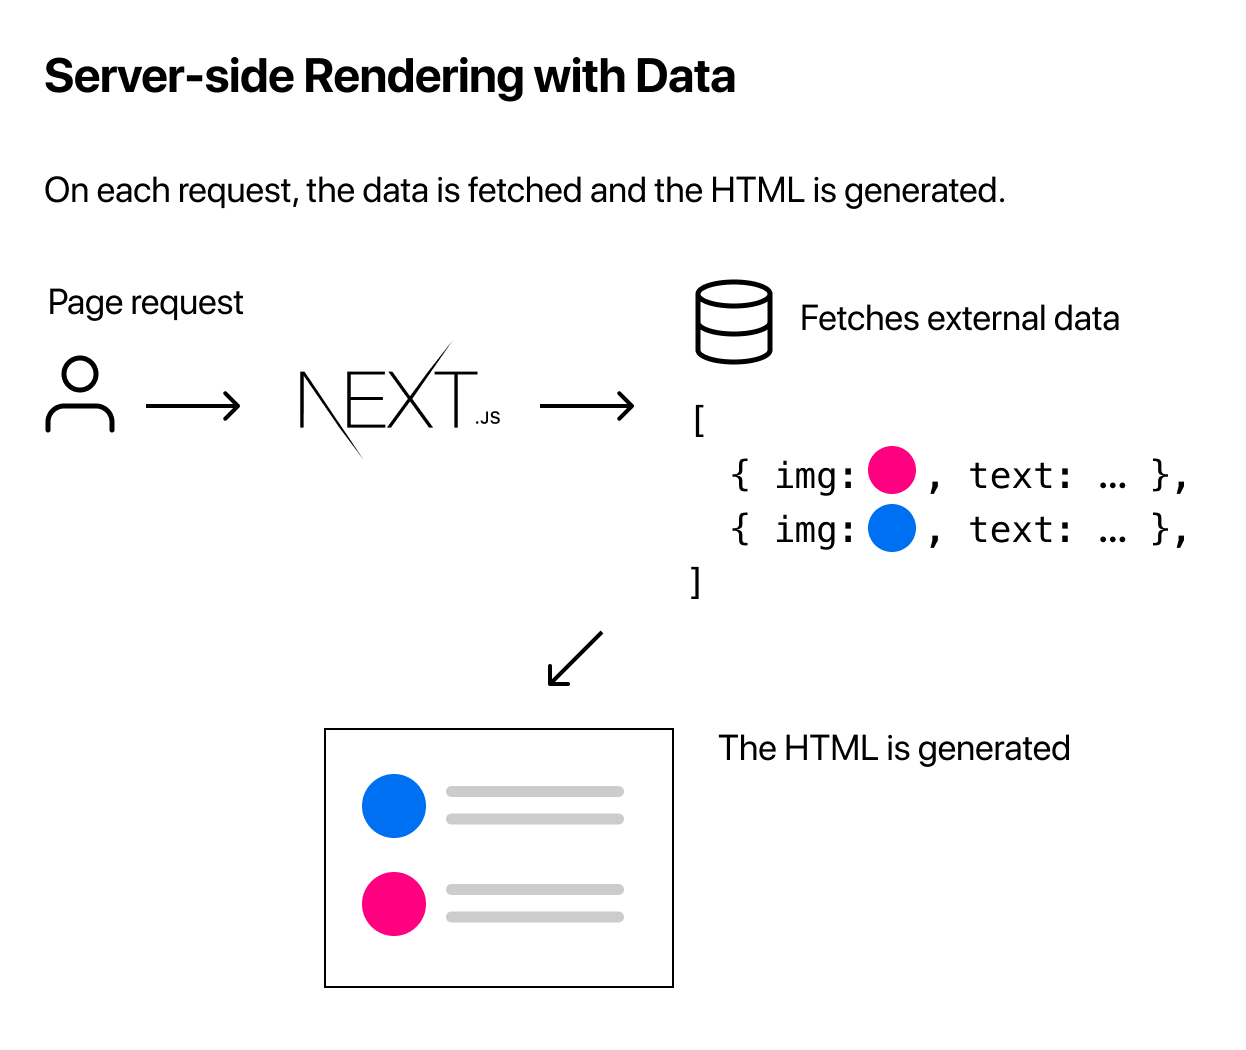
To use Server-side Rendering, you need to export getServerSideProps instead of getStaticProps from your page.
Using getServerSideProps
export async function getServerSideProps(context) {
  return {
    props: {
      // props for your component
    },
  };
}
Because getServerSideProps is called at request time, its parameter (context) contains request specific parameters.
You should use getServerSideProps only if you need to pre-render a page whose data must be fetched at request time. Time to first byte (TTFB) will be slower than getStaticProps because the server must compute the result on every request, and the result cannot be cached by a CDN without extra configuration.
Client-side Rendering
If you do not need to pre-render the data, you can also use the following strategy (called Client-side Rendering):
- Statically generate (pre-render) parts of the page that do not require external data.
- When the page loads, fetch external data from the client using JavaScript and populate the remaining parts.
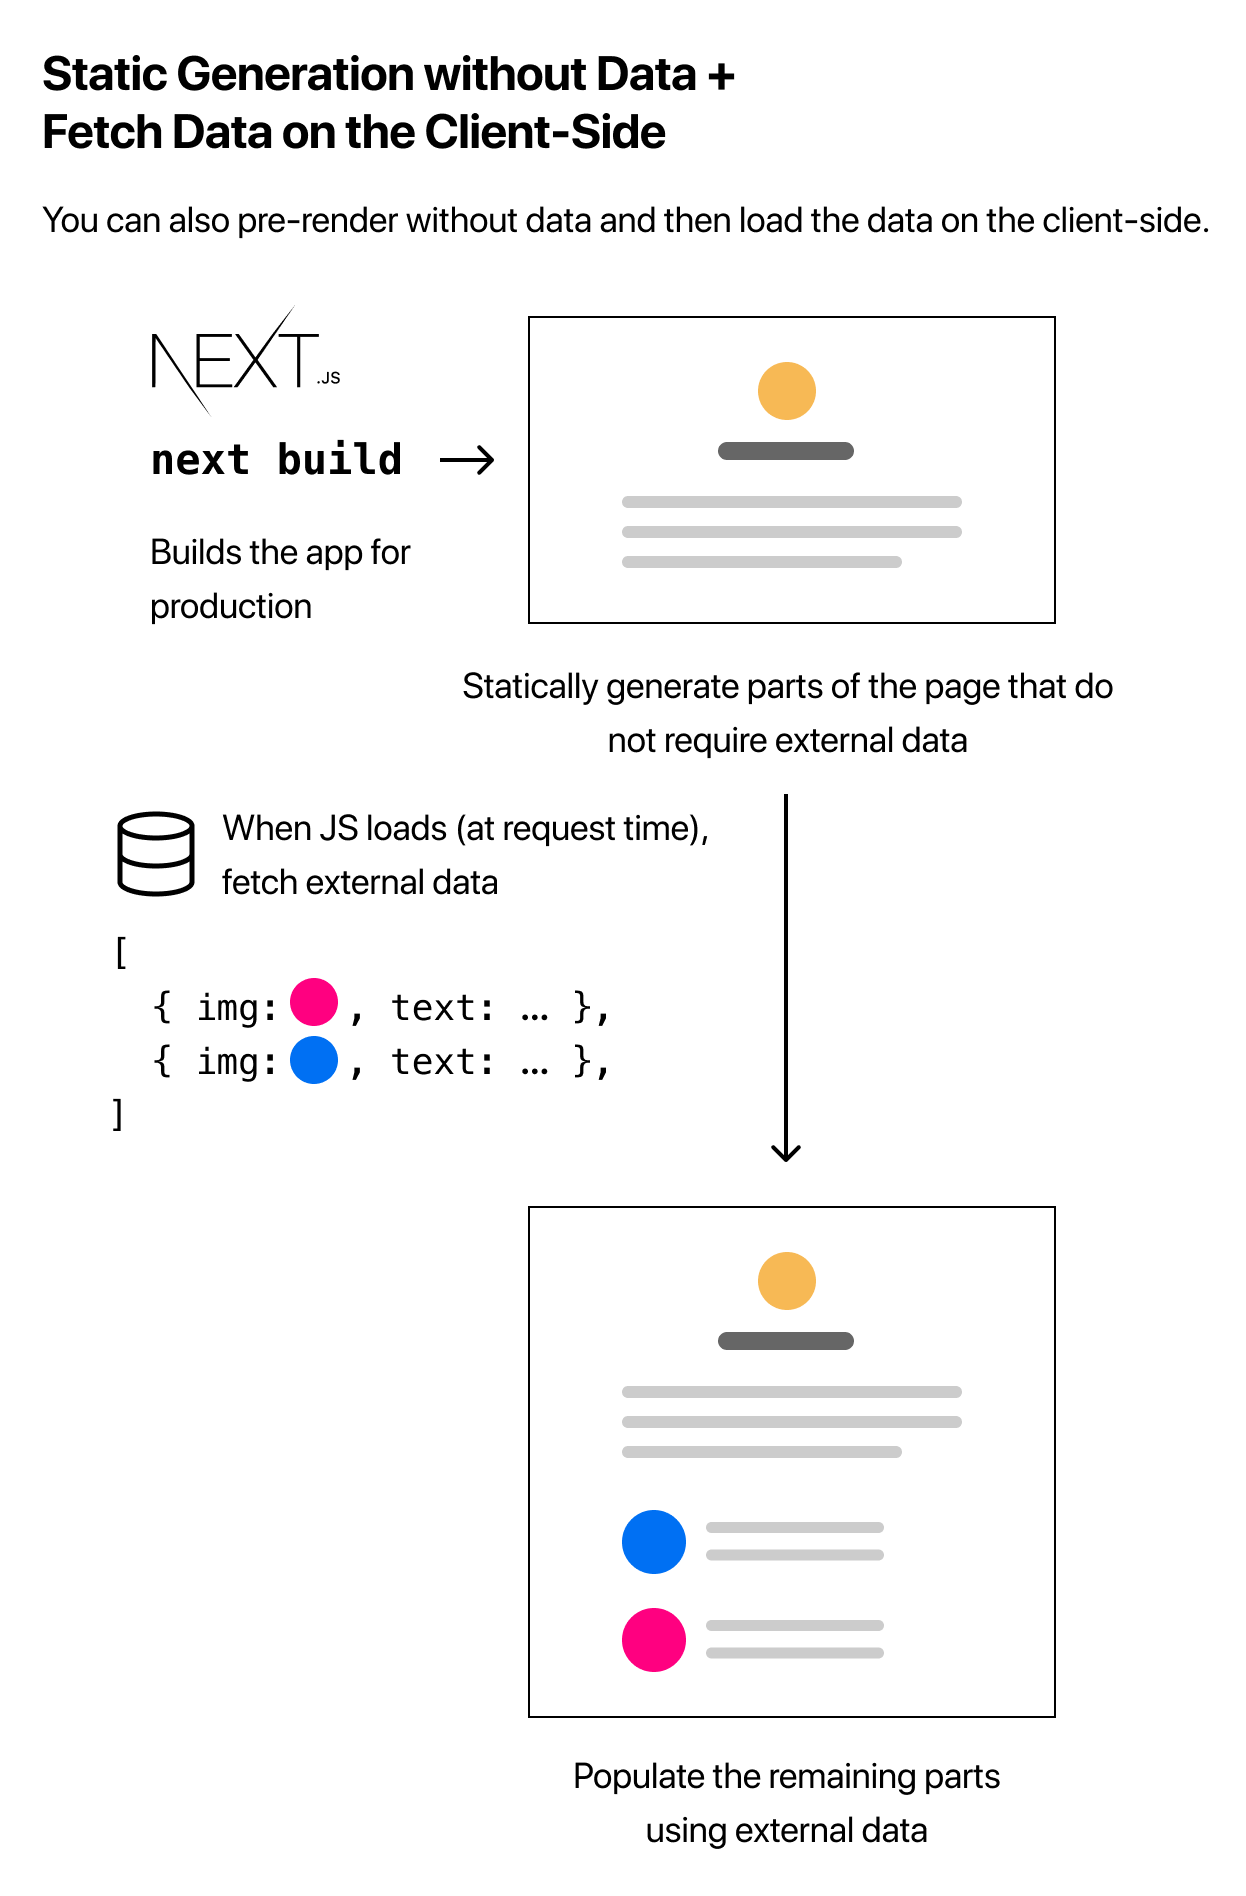
This approach works well for user dashboard pages, for example. Because a dashboard is a private, user-specific page, SEO is not relevant, and the page doesn’t need to be pre-rendered. The data is frequently updated, which requires request-time data fetching.
SWR
The team behind Next.js has created a React hook for data fetching called SWR. We highly recommend it if you’re fetching data on the client side. It handles caching, revalidation, focus tracking, refetching on interval, and more.
import useSWR from 'swr';

function Profile() {
  const { data, error } = useSWR('/api/user', fetch);

  if (error) return <div>failed to load</div>;
  if (!data) return <div>loading...</div>;
  return <div>hello {data.name}!</div>;
}
Check out the SWR documentation to learn more.
Dynamic Routes | Learn Next.js
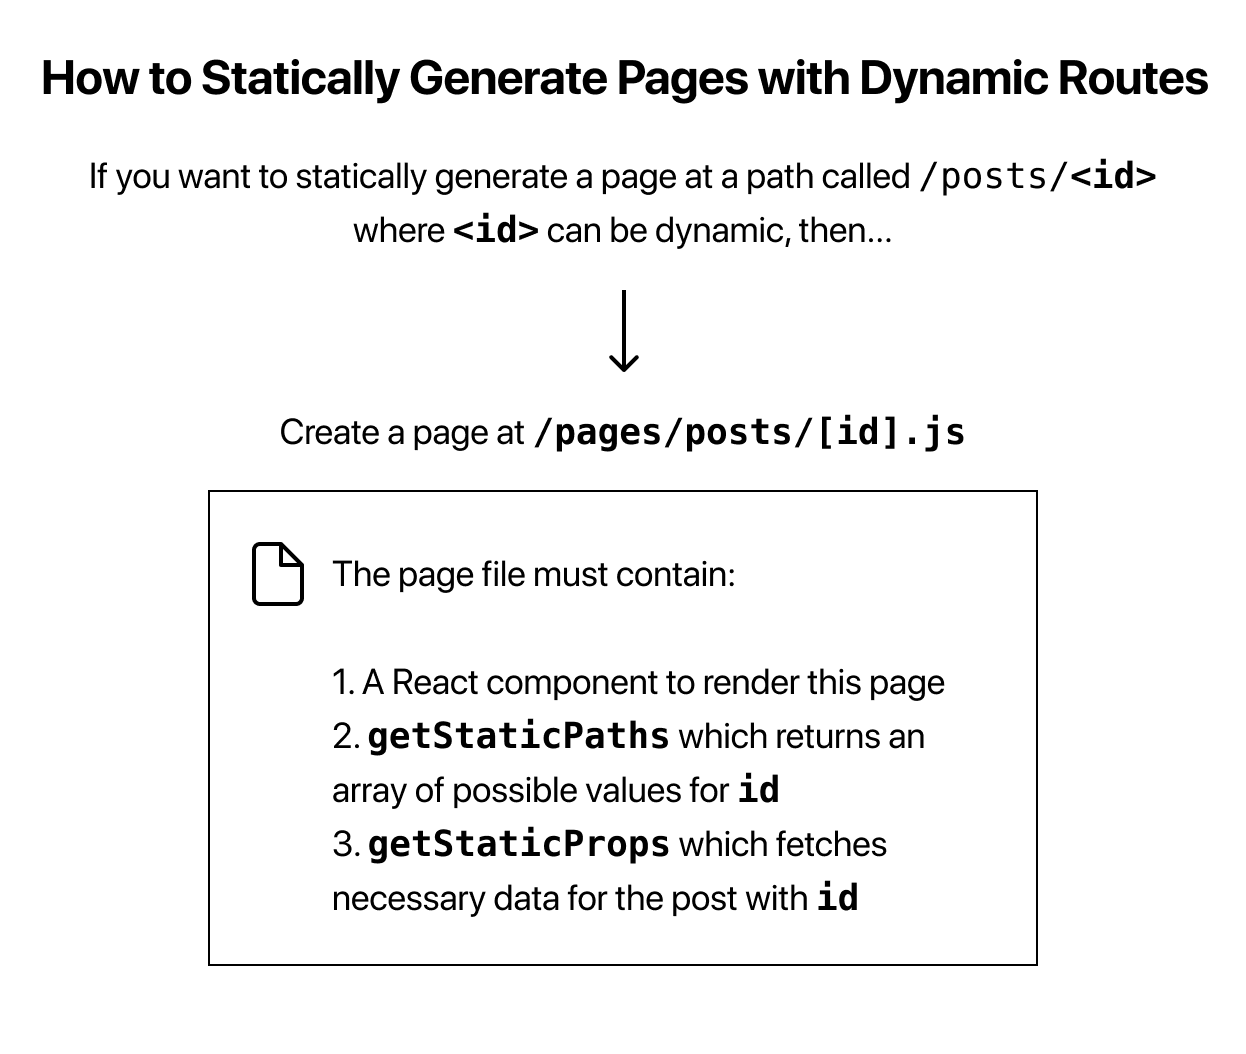
Pages that begin with [ and end with ] are dynamic routes in Next.js.
Fallback
If fallback is false, then any paths not returned by getStaticPaths will result in a 404 page.
If fallback is true, then the behavior of getStaticProps changes:
- The paths returned from
getStaticPathswill be rendered to HTML at build time. - The paths that have not been generated at build time will not result in a 404 page. Instead, Next.js will serve a “fallback” version of the page on the first request to such a path.
- In the background, Next.js will statically generate the requested path. Subsequent requests to the same path will serve the generated page, just like other pages pre-rendered at build time.
If fallback is blocking, then new paths will be server-side rendered with getStaticProps, and cached for future requests so it only happens once per path.
Learn more about fallback: true and fallback: 'blocking' in the fallback documentation.
Catch-all Routes
Dynamic routes can be extended to catch all paths by adding three dots (...) inside the brackets. For example:
pages/posts/[...id].jsmatches/posts/a, but also/posts/a/b,/posts/a/b/cand so on.
If you do this, in getStaticPaths, you must return an array as the value of the id key like so:
return [
  {
    params: {
      // Statically Generates /posts/a/b/c
      id: ['a', 'b', 'c'],
    },
  },
  //...
];
And params.id will be an array in getStaticProps:
export async function getStaticProps({ params }) {
  // params.id will be like ['a', 'b', 'c']
}
Take a look at the catch all routes documentation to learn more.
Router
If you want to access the Next.js router, you can do so by importing the useRouter hook from next/router.
404 Pages
To create a custom 404 page, create pages/404.js. This file is statically generated at build time.
// pages/404.js
export default function Custom404() {
  return <h1>404 - Page Not Found</h1>;
}
Take a look at our Error Pages documentation to learn more.
API Routes | Learn Next.js
Next.js has support for API Routes, which let you easily create an API endpoint as a Node.js serverless function.
Creating API Routes
API Routes let you create an API endpoint inside a Next.js app. You can do so by creating a function inside the pages/api directory that has the following format:
// req = HTTP incoming message, res = HTTP server response
export default function handler(req, res) {
  // ...
}
Learn more about the request handler above in the API Routes documentation.
They can be deployed as Serverless Functions (also known as Lambdas).
Creating a simple API endpoint
Let’s try it out. Create a file called hello.js in pages/api with the following code:
export default function handler(req, res) {
  res.status(200).json({ text: 'Hello' });
}
Try accessing it at http://localhost:3000/api/hello. You should see {"text":"Hello"}. Note that:
reqis an instance of http.IncomingMessage, plus some pre-built middlewares.resis an instance of http.ServerResponse, plus some helper functions
API Routes Details
Do Not Fetch an API Route from getStaticProps or getStaticPaths
You should not fetch an API Route from getStaticProps or getStaticPaths. Instead, write your server-side code directly in getStaticProps or getStaticPaths (or call a helper function).
Here’s why: getStaticProps and getStaticPaths run only on the server-side and will never run on the client-side. Moreover, these functions will not be included in the JS bundle for the browser. That means you can write code such as direct database queries without sending them to browsers. Read the Writing Server-Side code documentation to learn more.
A Good Use Case: Handling Form Input
A good use case for API Routes is handling form input. For example, you can create a form on your page and have it send a POST request to your API Route. You can then write code to directly save it to your database. The API Route code will not be part of your client bundle, so you can safely write server-side code.
export default function handler(req, res) {
  const email = req.body.email;
  // Then save email to your database, etc...
}
Preview Mode
Static Generation is useful when your pages fetch data from a headless CMS. However, it’s not ideal when you’re writing a draft on your headless CMS and want to preview the draft immediately on your page. You’d want Next.js to render these pages at request time instead of build time and fetch the draft content instead of the published content. You’d want Next.js to bypass Static Generation only for this specific case.
Next.js has a feature called Preview Mode to solve the problem above, and it utilizes API Routes. To learn more about it take a look at our Preview Mode documentation.
Dynamic API Routes
API Routes can be dynamic, just like regular pages. Take a look at our Dynamic API Routes documentation to learn more.
Deploying Your Next.js App | Learn Next.js
Next.js and Vercel
Vercel is made by the creators of Next.js and has first-class support for Next.js. When you deploy your Next.js app to Vercel, the following happens by default:
- Pages that use Static Generation and assets (JS, CSS, images, fonts, etc) will automatically be served from the Vercel Edge Network, which is blazingly fast.
- Pages that use Server-Side Rendering and API routes will automatically become isolated Serverless Functions. This allows page rendering and API requests to scale infinitely.
Vercel has many more features, such as:
- Custom Domains: Once deployed on Vercel, you can assign a custom domain to your Next.js app. Take a look at our documentation here.
- Environment Variables: You can also set environment variables on Vercel. Take a look at our documentation here. You can then use those environment variables in your Next.js app.
- Automatic HTTPS: HTTPS is enabled by default (including custom domains) and doesn’t require extra configuration. We auto-renew SSL certificates.
You can learn more about the platform in the Vercel documentation.
Other Hosting Options
Next.js can be deployed to any hosting provider that supports Node.js.
Your package.json should have the following build and start scripts:
{
  "scripts": {
    "dev": "next",
    "build": "next build",
    "start": "next start"
  }
}
In your own hosting provider, run the build script once, which builds the production application in the .next folder.
npm run buildAfter building, the start script starts a Node.js server that supports hybrid pages, serving both statically generated and server-side rendered pages, and API Routes.
npm run startTip: You can customize the
startscript inpackage.jsonto accept aPORTparameter by updating it as:"start": "next start -p $PORT".